
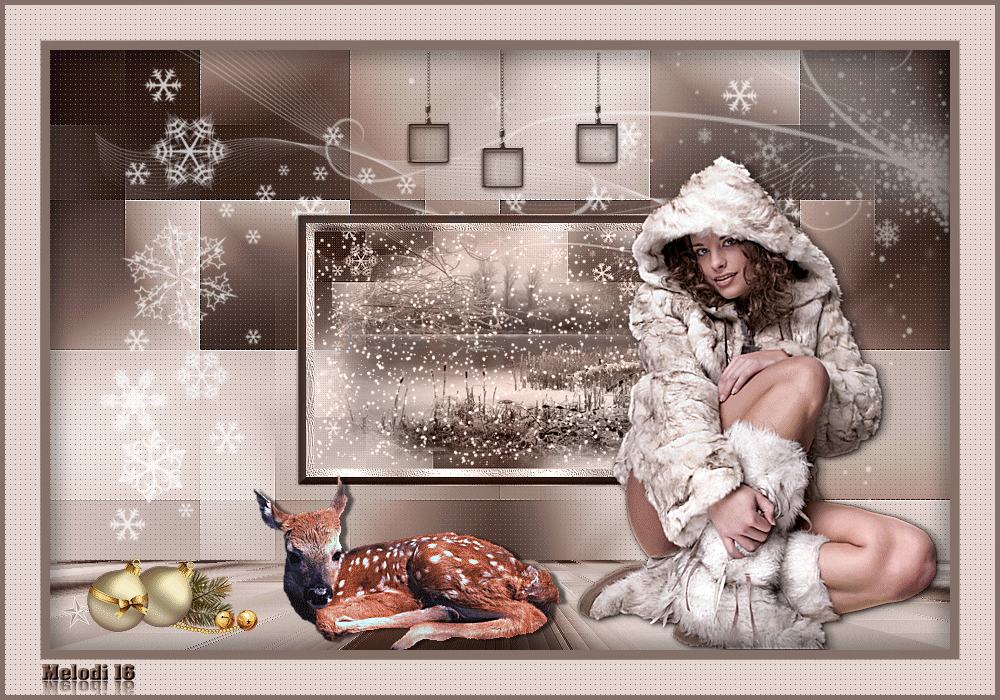
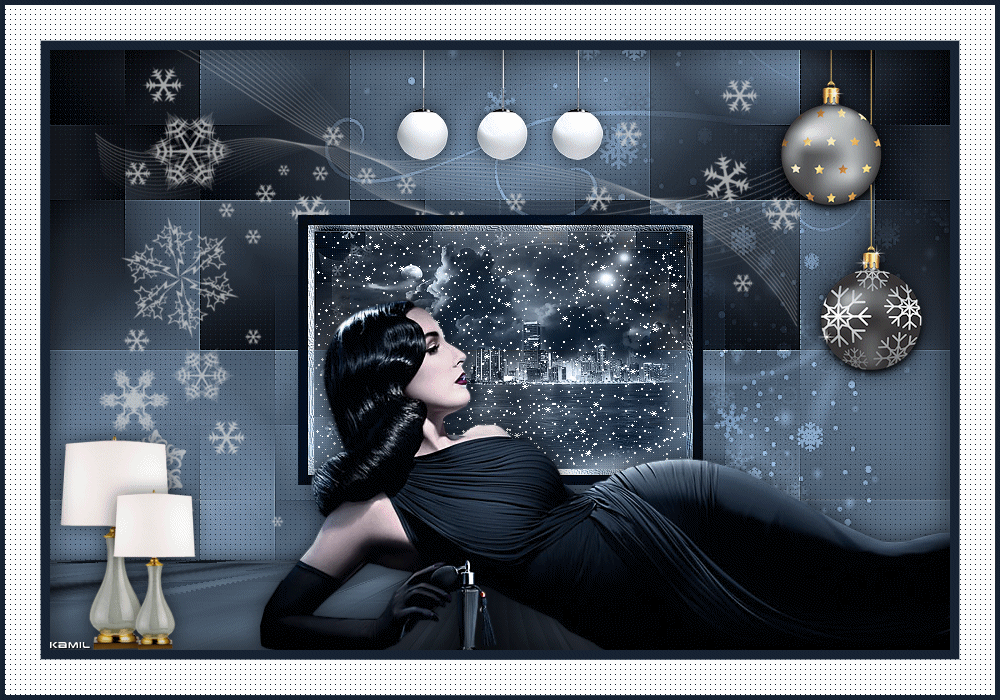
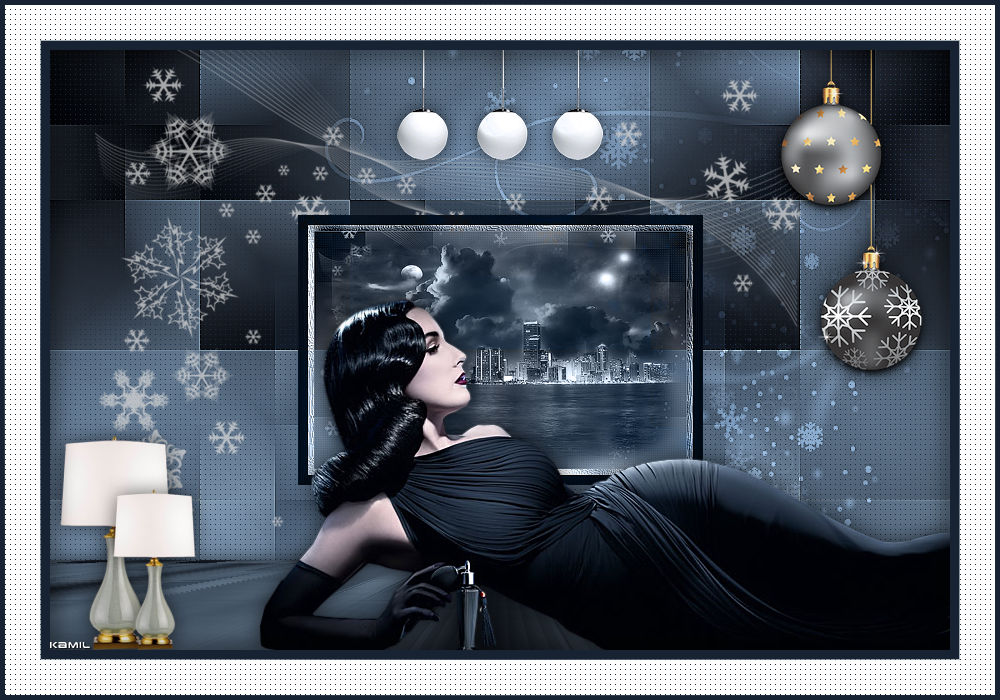
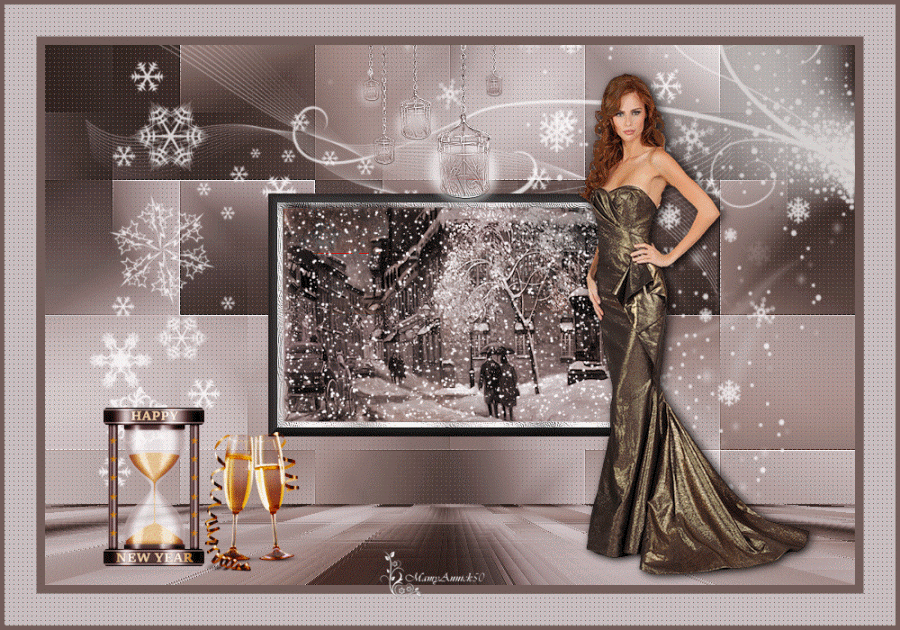
WINTER


This tutorial is written with PSP X8
Nederlandse vertaling door Lisette


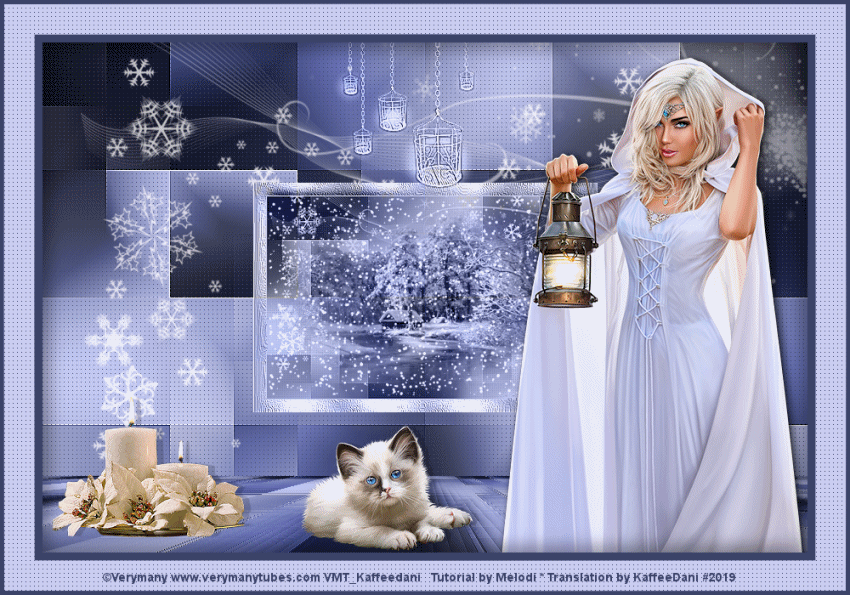
Danke für die Deutsch Übersetzung Daniela / Kaffee Dani's Tutorialkiste


Tubes : Internet
Plugins:
Mehdi – Wavy Lab 1.1
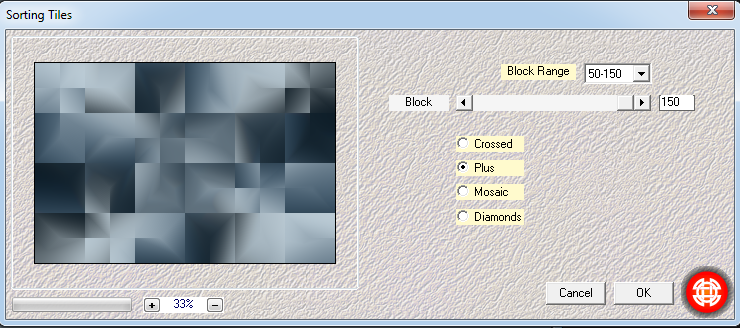
Mehdi –Sorting Tiles
<I.C.NET Software> Filters Unlimited2.0 - &<Bkg Designer IV>
Plugins -MuRa’s Filter Meister – Perspective Tiling 1.1
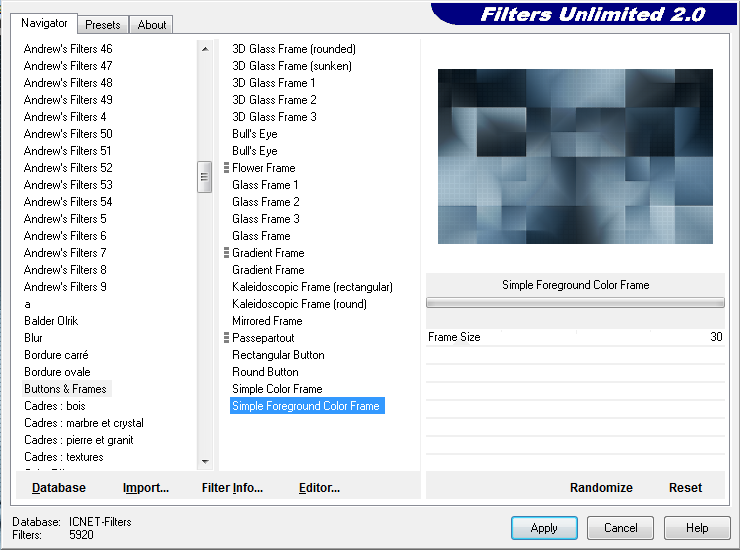
<I.C.NET Software> Filters Unlimited2.0 – Buttons&Frames
Alien Skin Eye Candy 5 Impact – Perspective Shadow
VDL Adrenaline / Snow Flakes
Preparation:
Copy the Selection in the material file and paste it into the Selections folder in My Psp Files on your computer.
Copy the silverpipes pattern from the material file and paste it into the Pattern folder in My Psp Files again.
Download materials by clicking below


Alternative Materials Link
[wpdm_package id='26652']
Colors used:
Foreground color to: #bbcad3

Background color to: #344b5d

#152129 (Choose a dark color from your)

BUTON : #404040

We start working
1- File Open – New 900 x 600
2- Effects -Plugins – Mehdi – Wavy Lab 1.1 Style Radial

3- Adjust –Blur-Guassian Bulur : 50
4- Effects -Plugins – Mehdi –Sorting Tiles : Block Range 50 – 150 Block: 150 Plus
5- Effects –Edge Effects –Enhance
6- Layer Duplicate
7- Image – Mirror – Mirror Horizontal
8- Layer Palette-Double click on this Layer and set the Blend Mode to Overlay - Opacity %50
9 - Layers - Merge down
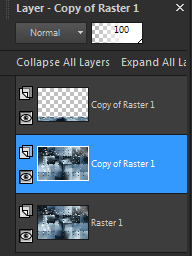
10- Layers - Raster 1 –Duplicate (Copy of Raster 1)
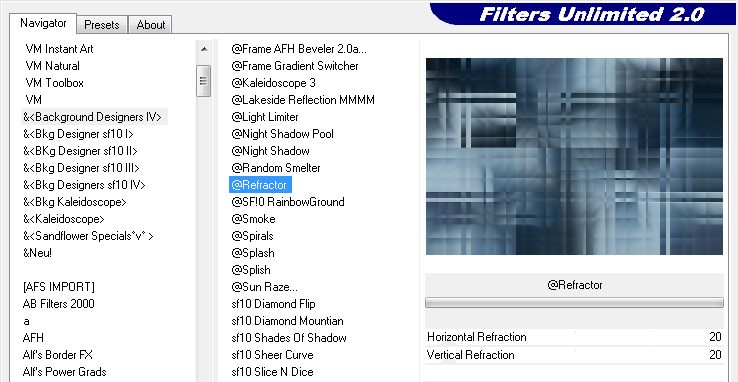
11- Effects-Plugins - <I.C.NET Software> Filters Unlimited2.0 - &<Bkg Designer IV> - @Refractor
12- Effects –Edge Effects –Enhance
13- Effects – Plugins -MuRa’s Meister – Perspective Tiling 1.1

14- Activate lower layer (Raster 1) / Layer Duplicate (Copy of Raster 1)
15- Effects –Texture Effects –Weave : 1 , 4, 1

16- Merge / Merge Down
Stay on the layer you are in
17- Layers -New Raster Layer / Flood Fiil Tool - #ffffff
18- Open- resize img Mask /minimize return work
19- Layers –New Mask Layer- From Image
20- Image –Mirror-Vertical
21- Merge Grup Opacity %55
22- Merge / Merge Down
23- Files -Open -deco noel /Edit – Copy and Minimize-Return to your work – Edit Paste As New Layer
24-Image –Mirror-Vertical
25- Image – Resize %90 (all layers not checked)
26- Effects – Image Effects – Ofset H: -45 V: 85

27- Opacity 75
28- Merge / Merge Down
29- Layer Duplicate (Copy of Raster 1)
30- Effects-Plugins - <I.C.NET Software> Filters Unlimited2.0 – Buttons&Frames –Simple Foreground Color Frame – Frame Size 30
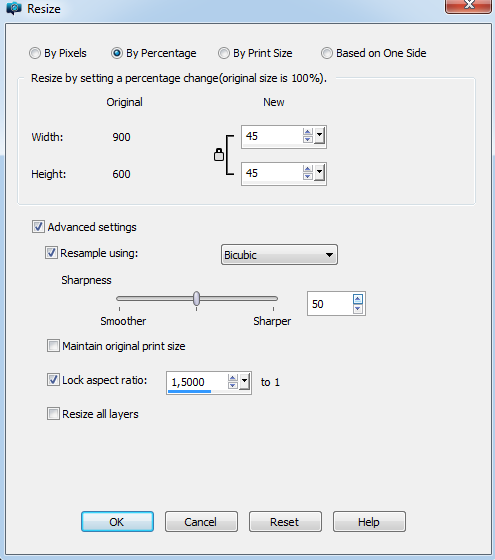
31- Image Resize % 45 (all layers not checked)
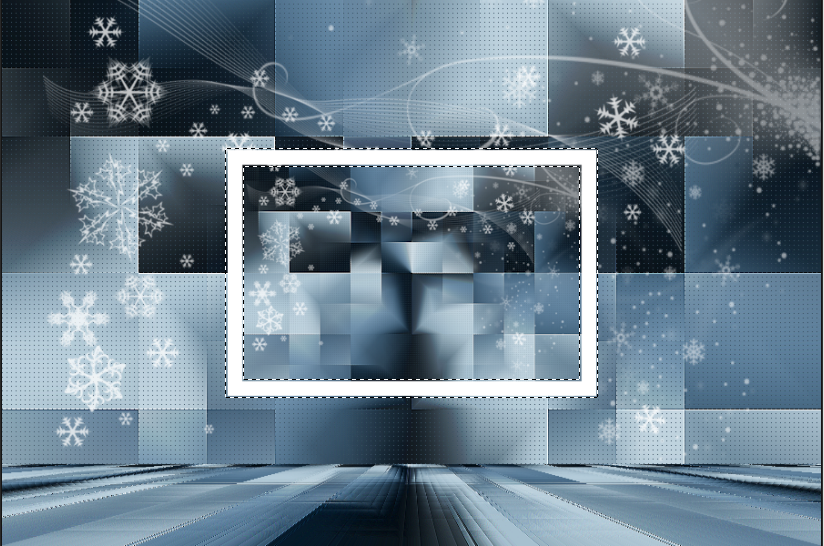
32- Selections Tool- Magic Vand Tool - Select white frame
33- Materials Properties – Open Pattern – Silverpipes / Flood Fiil Tool – Pattern Silverpipes
34- Effects – Texture Effect- Soft Plastic : Blur: 30 - Detail: 45 - Densty: 125 Angle : 45

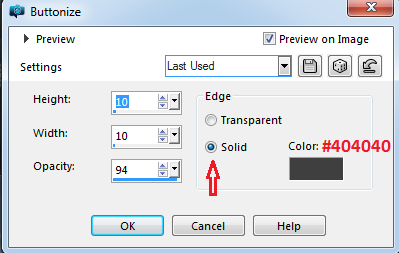
35- Effects- 3D Effects –Butonize - H: 10 – V: 10 – O: 94 Color : #404040
36- Selections –Select None
37- Selections –Load/Save Selection- Load Selection From Disc – Melodi New Year 1
38- File -Open - tubes png manzara
39- Edit – Copy and Minimize-Return to your work -Edit Paste In to Selections
40- Selections –Select None
41- Layer Palette-Double click on this Layer and set the Blend Mode to Luminance (Legacy)
42- Adjust Sharpness – Sharpen
Current View

43- Activate Top Layer (Copy of Raster 1)
44- Files -Open -deco lamp - Edit Copy
45- Edit – Copy and Minimize-Return to your work – Edit Paste As New Layer
46- Image – Resize % 40 (all layers not checked)
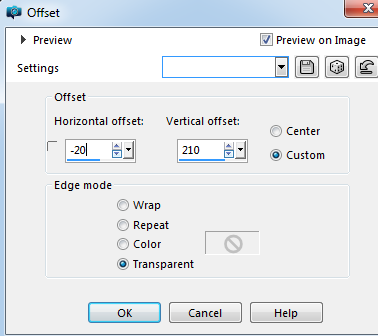
47- Effects – Image Effects – Ofset H: -20 V: 210
48- Layer Palette-Double click on this Layer and set the Blend Mode to Luminance (Legacy)
49- Adjust Sharpness – Sharpen More (repeat twice)
50- Files -Open –tube Snow Queen
51- Edit – Copy and Minimize-Return to your work – Edit Paste As New Layer
52- Image – Resize % 95 (all layers not checked)
53- Effects – Image Effects – Ofset H: 270 V: -50

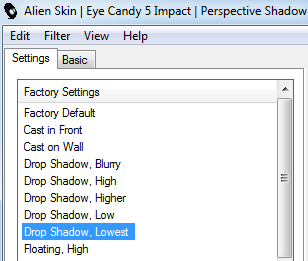
54- Effects – Plugins – Alien Skin Eye Candy 5 Impact – Perspective Shadow – Settins –Drop Shadow , Lowest
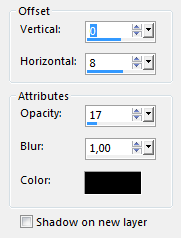
55- Effets – 3D Effects – Drop Shadow – V: 0 H: 8 O: 17 B: 1
56- Adjust Sharpness – Sharpen More
57- Files -Open –tube candle- Edit Copy
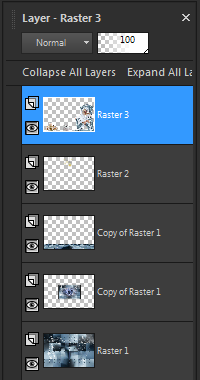
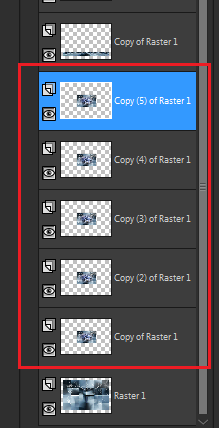
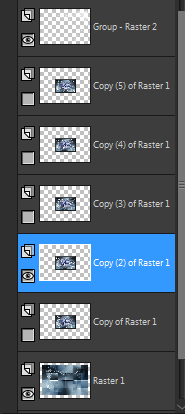
58- Edit – Copy and Minimize-Return to your work – Edit Paste As New Layer
59- Image – Resize % 35 (all layers not checked)
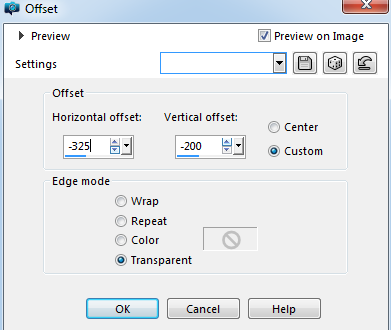
60- Effects – Image Effects – Ofset H: -325 V: -200
61- Effets – 3D Effects – Drop Shadow – V: 0 H: 8 O: 17 B: 1
62- Adjust Sharpness – Sharpen
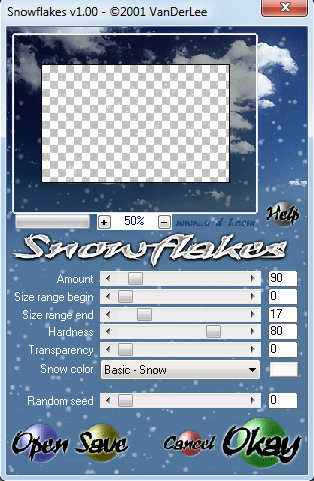
63- Files -Open –tube cad- Edit Copy
64- Edit – Copy and Minimize-Return to your work – Edit Paste As New Layer
65- Image – Resize % 30 (all layers not checked)
66- Effects – Image Effects – Ofset H: -50 V: -225
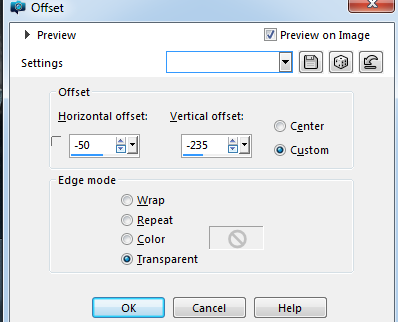
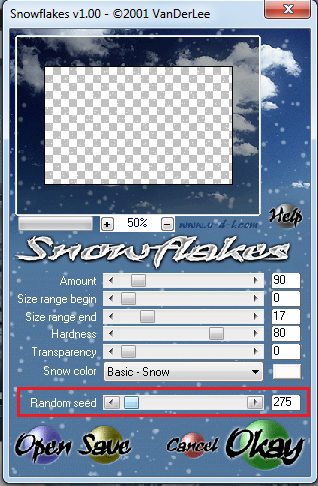
67- Effets – 3D Effects – Drop Shadow – V: 0 H: 8 O: 17 B: 1
68- Adjust Sharpness – Sharpen More
69- Merge Merge Down (repeat twice)
Layer palette
70- Layers: New raster layer
71- Image –Canvas Size V: 1000 / H: 700

72- Selections: Select All
73- Fill this layer with background color #344b5d
74- Selections: Modify - Contract with 50 / Press Delete on the keyboard
75- Selections: Select All
76- Selections: Modify - Contract with 5
77- Selections: Modify – Select Selection Borders -With 35
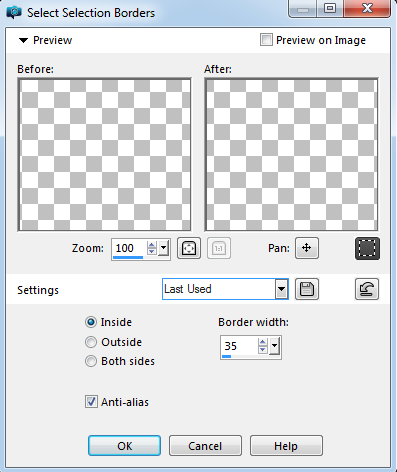
78- Borders Fill the selection with foreground color #bbcad3
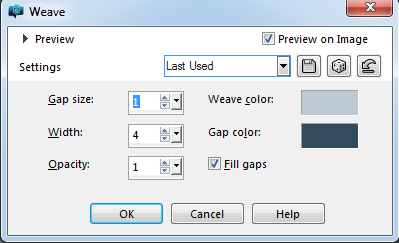
79- Effects- Texture Effects - Weave with
80- Selections-Select None
81- Effects-3D effects - Drop shadow 10 - 10 - 30 - 25 black
82- Repeat with min 10 - min 10 - 30 – 25
83- Take your signature
84- Activate Layer Copy of Raster 1

85- Layers Duplicate (Repeat 4 times) 5 of the same layer
86- Activate Copy (5) of Raster 1
87- Layers – New Raster Layer (Raster 5)
88- Selections –Load/Save Selection- Load Selection From Disc – Melodi New Year 2
89- Effects – Plugin – VDL Adrenaline / Snow Flakes
90- Layers – Merge – Merge down
91- Close the layer eye, activate the lower layer (Copy (4) of Raster 1)
92- Layers – New Raster Layer (Raster 5)
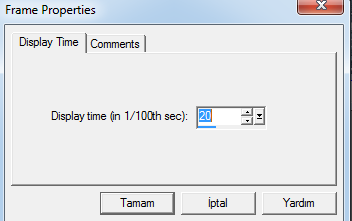
93- VDL Adrenaline / Snow Flakes -Adjust the same, just replace the random seed 275
94- Layers / Merge / Merge Down
95- Close the layer eye, activate the lower layer (Copy (3) of Raster 1)
96- Layers – New Raster Layer (Raster 5)
97- VDL Adrenaline / Snow Flakes -Adjust the same, just replace the random seed 500
98- Layers / Merge / Merge Down
99- Close the layer eye, activate the lower layer (Copy (2) of Raster 1)
100- Layers – New Raster Layer (Raster 5)
101- VDL Adrenaline / Snow Flakes -Adjust the same, just replace the random seed 545
102- Layers / Merge / Merge Down
103- Close the layer eye, activate the lower layer (Copy) of Raster 1)
104- Layers – New Raster Layer (Raster 5)
105- VDL Adrenaline / Snow Flakes -Adjust the same, just replace the random seed 700
106- Layers / Merge / Merge Down
107- Selections-Select None
We start animation
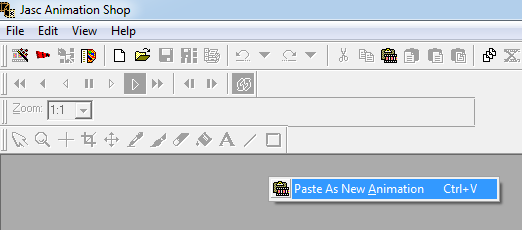
108- Right button on our work Copy Merged (Copy of Raster 1)
109- Open Animation Shop - Paste as new animation
110- Close the layer eye ./Activate top layer, open eye (Copy (2) of Raster 1)
111- Right button on our work Copy Merged
112- Back to Animation Shop - Paste / After Current Frame
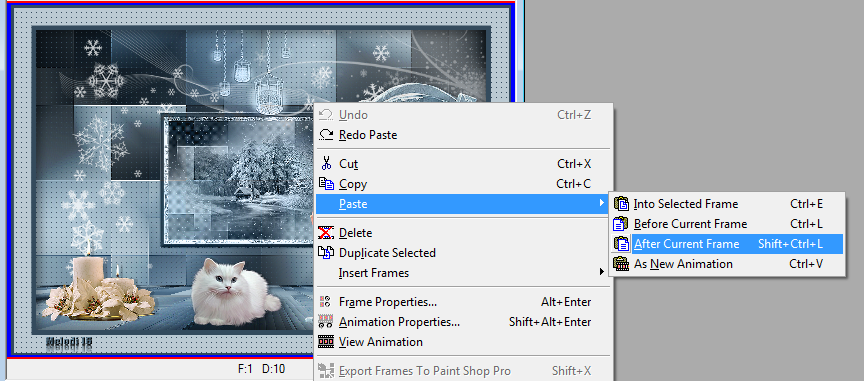
113- Close the layer eye, activate top layer, open eye (Copy (3) of Raster 1)
114- Right button on our work Copy Merged / Back to Animation Shop - Paste / After Current Frame
115- Close the layer eye, activate top layer, open eye (Copy (4) of Raster 1)
116- Right button on our work Copy Merged / Back to Animation Shop - Paste / After Current Frame
117- Close the layer eye, activate top layer, open eye (Copy (5) of Raster 1)
118- Right button on our work Copy Merged / Back to Animation Shop - Paste / After Current Frame
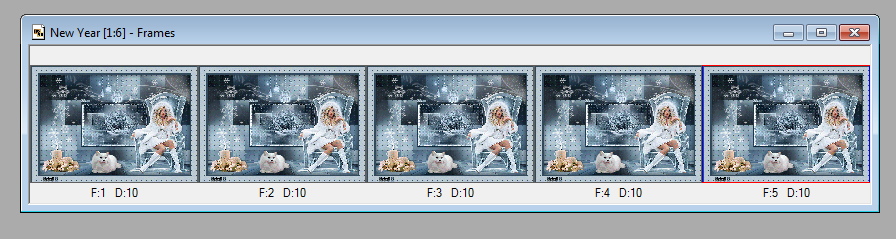
119- Edit – Sellect All
120- Right click on first layer / Frame Properties
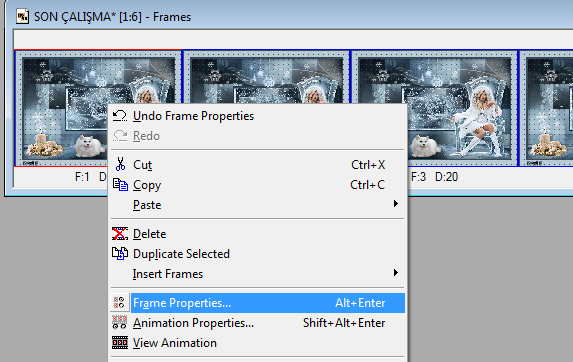
121- Display Time 20
We slowed down the snow
122- File – Save As / Save as Gif
Teşekkürler Kamil Bey
Thank you Kaffeedani
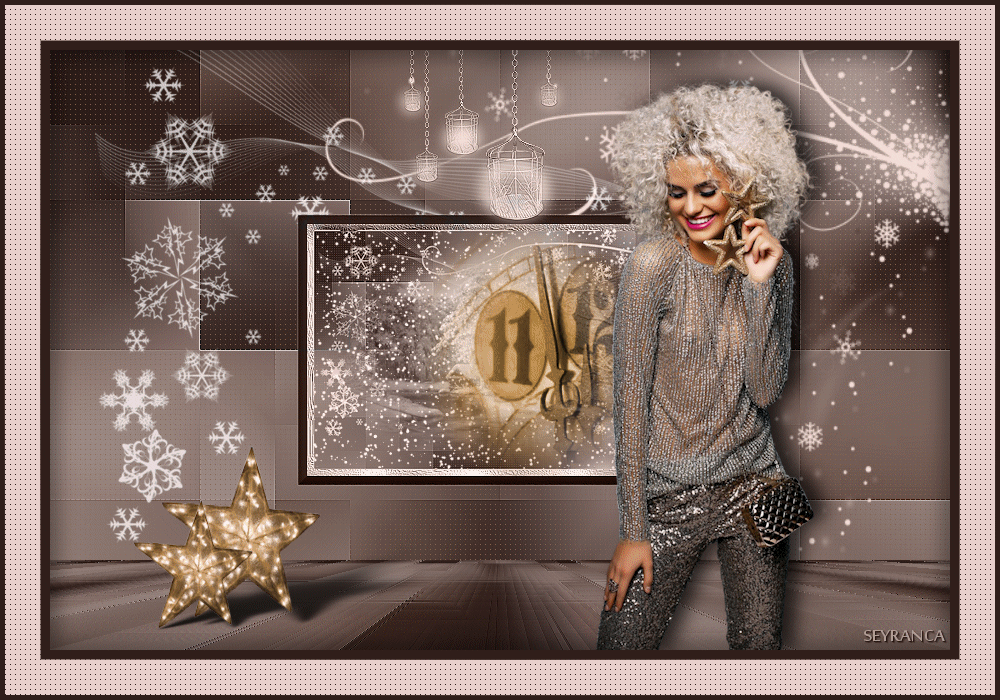
Teşekkürler Seyran
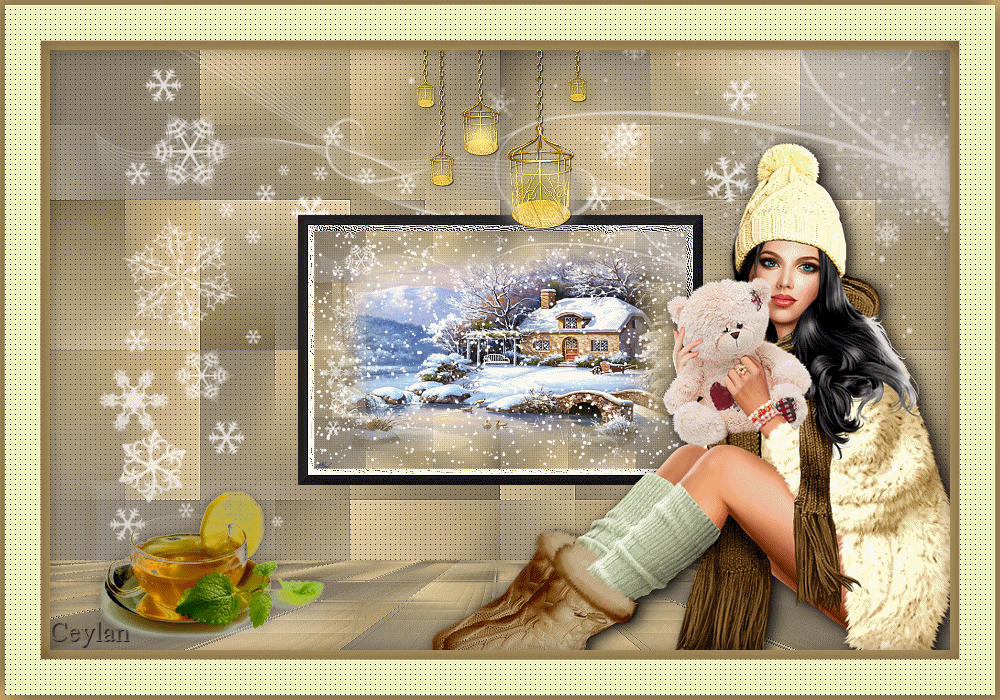
Teşekkürler Ceylan
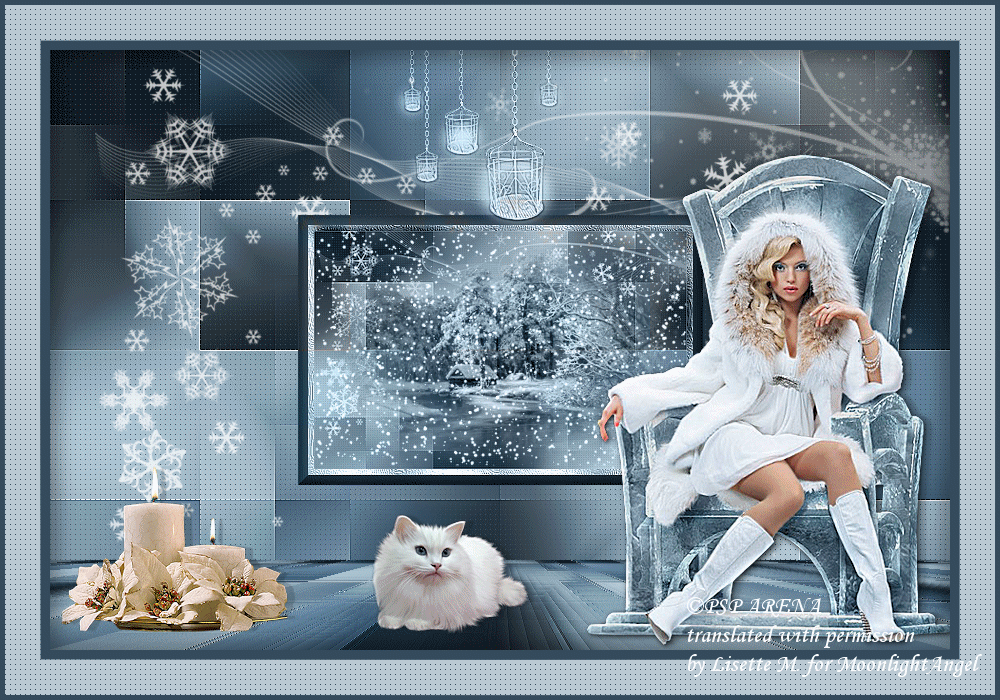
Thank you moonlightangel
 Thank You Vera
Teşekkürler Mustafa Kemal

Teşekkürler Dilek

Teşekkürler Tamer
Thank you Stanis

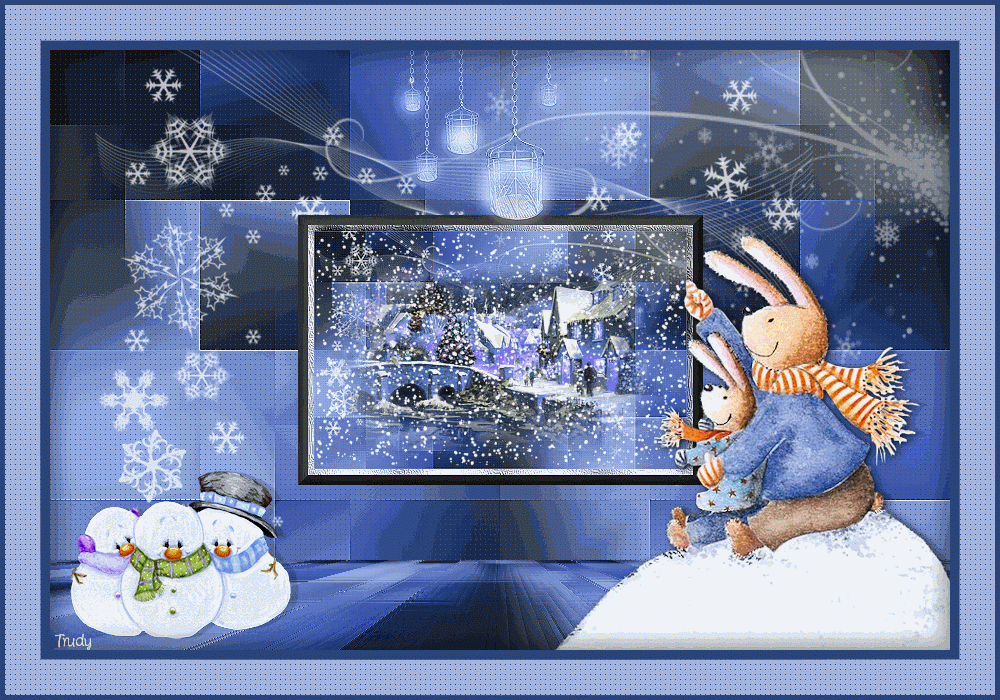
Thank you Trudy

Thank you Mamy
Thank You Garances

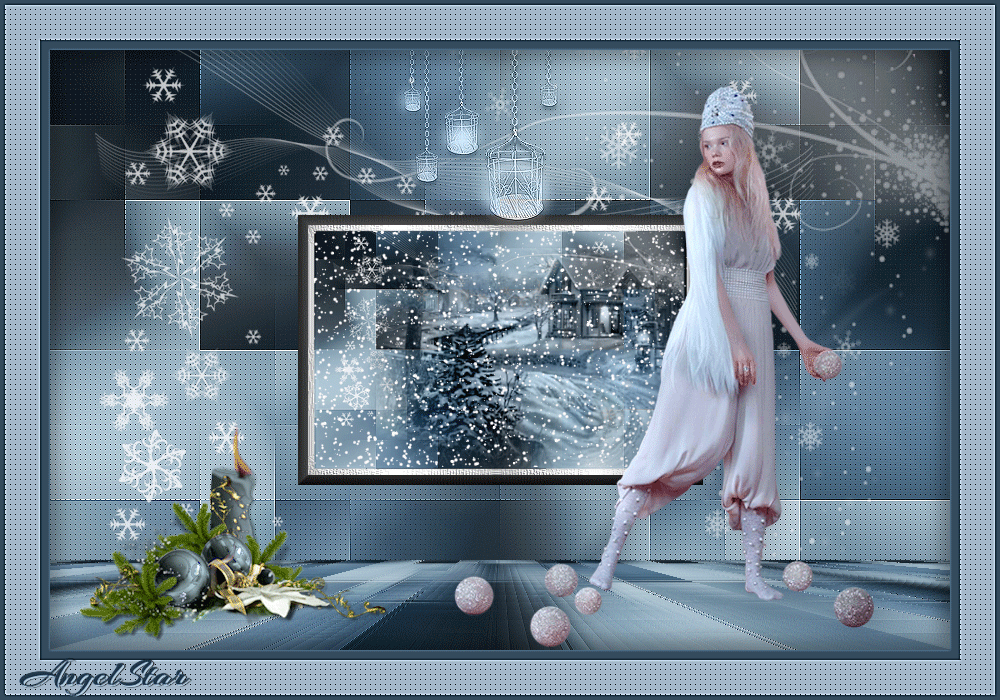
Thank You Angel Star
Thank You Trudy
Thank You Creations Beatgraph

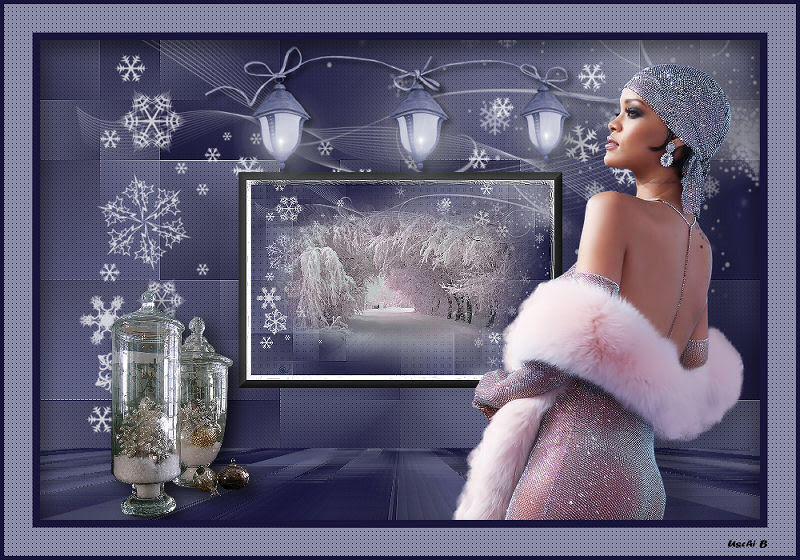
Thank you Uschi
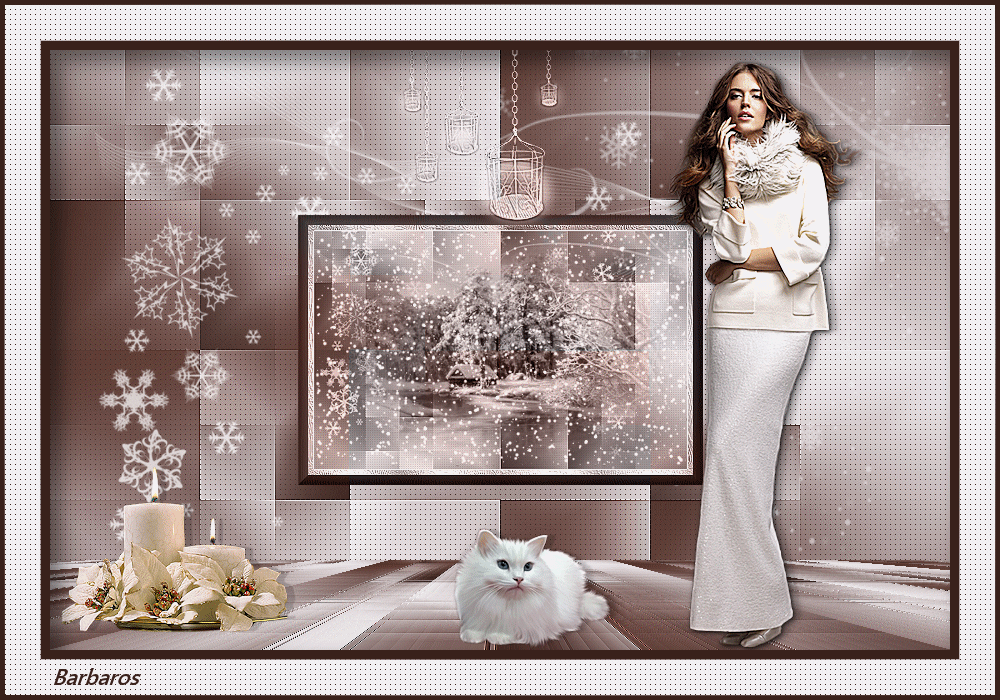
Teşekkürler Barbaros
Thank You Clo


